Wednesday, August 28, 2013

Pinwheels & .....

Paula sent me the cheeriest quilt...it has lovely pinwheels and then empty blocks.  EMPTY blocks!!  Oh what fun...I played and played trying to decide what to put in those empty blocks. Should I do "ghost" pinwheels, should I do a feather fill, what to do???? (Are you wondering where the picture is of the whole quilt?? Me too--I thought for sure I'd taken one or twenty, apparently not!)  This is as close as I got *shrug*


After much agonizing, this is what I came up with for those formerly empty blocks: (Does this look familiar?? It should...click here)


The border had me a bit puzzled as well, but after a few minutes contemplation, I just copied the fabric design.  I think it works, don't you?


More pics for your viewing pleasure...

A view of the quilt with the border framing it...


I bet you're wondering why I have a photo of the thread, eh??  Well, here's why: Paula wanted me to quilt the quilt with pink thread--so I did. Of course, I used the lightest pink I could find which reads as white. I am not a quilter who thinks that my quilting should take center stage on someone else's quilt. So...I went for texture. I always go for texture. I want your quilt to be the star, not my quilting!


Thanks for stopping by!!


Saturday, August 24, 2013

Merry Mayhem Will Have a New Home

Have you ever done Planet Patchwork's Merry Mayhem quilts? Each year on New Year's Day they have a mystery quilt project. I have wanted to participate for years, but we've always had company on New Year's Day so it never happened. This last year, however, no company so I pieced this top.


Before you judge my fabric choices too harshly, keep in mind that it was a "mystery" quilt and that I used only fabrics from my stash. I later purchased the binding, but that doesn't count.  To make up for my less than stellar fabric choices, I quilted the snot out of this one. While this quilt was on the frame, Dennis came home and told me that the skipper of the J-Boat he races on prides himself on raising the most money for an annual Hospice fund raiser here in Sequim. With that in mind, I offered them this quilt and they will be raffling it off. I hope it brings them lots of cash!!

Here are some quilting close-ups for your viewing pleasure. I designed my quilting based on units in these four squares. I actually had to draw them out to make sure I had the feathers going at the correct angle and make sure the proper design went in the correct square. Way too much concentration involved!!


The center sashing block motif--one of my go-to faves!!


Another shot of the basic four design


One of the individual blocks in the four-part design


Another one...

.

And then the back! I think the back is better than the front. (go ahead; click on this pic
 and make it bigger...the quilting really shows up)


Not sure what happened to the color here, but you can still see the quilting.


And the last one--just for good measure.


I sure hope that whoever (whomever?) has the winning ticket, they enjoy it! It has a wool batt, so it will keep them toasty.

Tuesday, August 20, 2013

Clallam County Fair

Although its not the Plumas County Fair, it was still fun.  I'm so used to Plumas though and knowing practically everyone else that I see.  I didn't know a soul at this fair *sigh*

But...I got a first:


And a second!


Thursday, August 15, 2013

A Giant Pat on the Back

Opened up my Facebook page and saw this:

"Dorothy, there are many lovely quilts at the Plumas County Fair
 that you quilted and many ribbon winners. Your art has lifted the bar at our fair."

Wow...did that make me feel good!! I just had to share it with those of you that read my blog. I'm walking around on Cloud 9 today!!


Tuesday, August 6, 2013

Two Tools I Can't Live Without

If you have these:


You can mark this:


Then erase the unnecessary lines:


And quilt this:


I love these tools!!!

Friday, August 2, 2013

Quilt Mock-up Tutorial

I asked Becca, and because she doesn't have a blog, she gave me permission to re-post her Mock-up Tutorial here. I'm not sure how much good this will do for most of you. The Quilt-Along file provided us with a drawing of the quilt to plan our colors.

QAL MOCKUP TUTORIAL

First thing is to go to the QAL blog and get the color chart; this is not the .pdf version.


Right click on the page and then click "save image as." Another box will pop up asking you to choose a file to put it in. I put mine in a new folder marked QAL Mockup so that I'd have it in one place as I added new blocks.

See mine here:

Now for the fun part: getting those pictures added. Once you figure it out, its like riding a bike. First, the pics must be resized. Open your Paint program (btw, every computer has a Paint program. Find yours by going to the Start menu--its the little globe in the lower left corner of your computer screen--and click "All Programs." Scroll down until you see the folder called "Accessories." Click that open and scroll down again until you see it--trust me, its there. Pin the Paint program to the task bar by right clicking. This causes another box to come up and you can check "Pin to Task Bar.") Now, open up that Paint program and let's get started.

Click the dark blue button.


It will open a box like this:


Click the Open File here and bring up the pic of your first block. It will look like this in Paint:


Its big, I know, but click the Resize button; it opens a box that looks like this:

Be sure that the dot next to "pixels" is clicked and change the top number (horizontal) to 100. The vertical number will change respectively. Your once very large block now looks like this:

Now here's the fun part: Click the selection block little arrow and then click the rectangle selection. Next, move your cursor over your block from the upper left corner and drag to the lower right corner--like this:

A dotted line will be around your block. In the upper left corner of the Paint program, click the "File Save" button. A box will come up and crop your picture. You'll see that the dotted line is gone and now you can save this to your newly created QAL Mockup file.


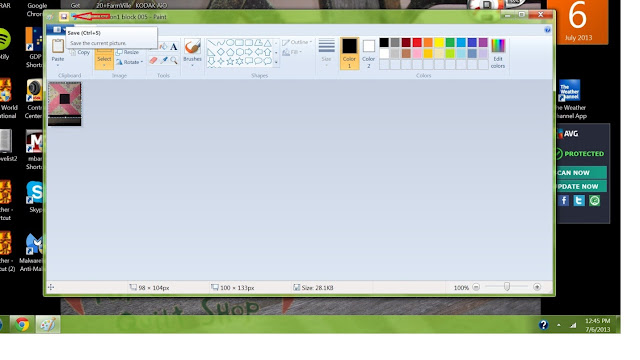
Click the dark blue button in the upper left corner and hit "Save As." A list will come up like this:


Make sure you hit .jpg; it will make it easier to use your pic when placing it on your mockup. Now lets add these pics to the mockup!

Open your Paint program again and click the dark blue button in the upper left corner. Then open the folder and get the mockup from your saved file.


Click the box for the first block we made in the upper left corner and drag to the lower right; this will select the block we want to fill. Then click paste (upper left) and click the arrow like this:


Paste will open up a box so that you can find your newly cropped pic in your QAL Mockup file. You can position it to center or un-check the horizontal/vertical option to play with the dimensions so that it will fit properly.


Although it does seem a bit complicated, it really isn't. Just a bunch of clicking in the right places. (Or so Becca tells us!!)

* * * * *

Thanks, Becca for letting me post this. I hope those of you reading can use this.